Fixing Broken Wood Fence Posts
Fix broken wood fence post – Fixing broken wood fence posts is a common DIY project, often requiring a combination of assessment, repair, or replacement. This comprehensive guide covers everything from identifying the problem and understanding its causes to choosing the right repair method, procuring the necessary tools and materials, and even preventing future damage. Whether you’re dealing with minor cracks or a completely broken post, we’ll provide detailed steps for effective repairs and replacements.
From evaluating the extent of damage to selecting the best materials, this guide will walk you through the process. We’ll examine different wood types, their durability, and how various factors contribute to post breakage. The information presented includes crucial details for successful repair and replacement, including detailed steps and considerations for different types of damage. This is a practical resource for anyone facing this common home improvement task.
Identifying the Problem: Fix Broken Wood Fence Post
Wood fence posts, a crucial component of any fencing system, can suffer various degrees of damage. Understanding the nature of these issues is essential for effective repair or replacement. This section details different types of damage, potential causes, and how to assess the structural integrity of a compromised post.
Wood fence posts can exhibit a range of problems, from minor imperfections to complete failure. These problems can significantly impact the fence’s overall stability and aesthetic appeal. Identifying the specific type and extent of damage is crucial for determining the appropriate course of action.
Types of Broken Wood Fence Posts
Various levels of damage affect wood fence posts. Minor damage might involve hairline cracks, while more significant damage includes leaning posts or complete breakage. These conditions can vary depending on the severity of the damage.
- Minor Cracks: Hairline cracks, though seemingly insignificant, can be early indicators of underlying issues. These cracks might be caused by stresses from weather or ground shifting. Over time, these cracks can widen and worsen, requiring more extensive repairs or replacement.
- Significant Leaning: A fence post that is leaning noticeably from its original vertical position indicates structural compromise. This often results from a combination of rot, insect infestation, or soil settlement. Left unaddressed, leaning posts can cause the entire fence line to become unstable.
- Complete Breakage: A completely broken post requires immediate attention. The break could be caused by severe weather, impact, or a combination of factors. This usually indicates significant structural damage and likely necessitates replacing the entire post.
Causes of Wood Fence Post Breakage
Several factors can contribute to the deterioration of wood fence posts. Understanding these causes helps prevent future damage and guides appropriate repairs.
- Rot: Wood rot is a common culprit for fence post damage. Moisture and fungi are the primary causes. The rot typically progresses from the ground level upwards, weakening the post over time.
- Insect Infestation: Termites, carpenter ants, and other wood-boring insects can severely damage wood fence posts. These insects create tunnels and galleries, weakening the structure and making it susceptible to further damage. Careful inspection for signs of insect activity is essential.
- Weather Damage: Exposure to extreme weather conditions, including harsh sun, rain, and freeze-thaw cycles, can weaken the wood over time. These forces can cause stress cracks and ultimately lead to complete breakage.
Wood Types and Durability
Different wood types exhibit varying levels of resistance to rot, insects, and weather. The choice of wood affects the longevity of the fence posts.
| Wood Type | Durability | Typical Use |
|---|---|---|
| Pressure-treated Pine | Good, relatively resistant to rot and insects. | Common choice for fence posts due to affordability and adequate durability. |
| Cedar | Excellent, highly resistant to rot and insects. | Often preferred for its natural durability and aesthetic appeal. |
| Redwood | Excellent, extremely resistant to rot and insects. | Known for its exceptional durability, often used in high-stress applications. |
Signs of a Damaged Post Requiring Repair or Replacement
Recognizing warning signs allows for timely intervention and prevents more significant damage.
- Visible Cracks or Splits: Hairline or significant cracks in the post suggest stress and potential structural weakness.
- Leaning or Tilting: A post leaning from its vertical position indicates structural instability and needs immediate attention.
- Soft or Hollow Spots: Soft spots or hollow sounds when tapped on the post indicate rot or insect infestation, compromising the structural integrity.
Assessing Structural Integrity
Properly evaluating a post’s structural integrity is essential for determining the need for repair or replacement.
- Visual Inspection: Thoroughly examine the post for visible signs of damage, such as cracks, leaning, or insect activity.
- Tapping Test: Lightly tap the post with a hammer or similar tool. A hollow sound or a soft spot suggests internal damage.
- Checking Ground Stability: Assess the soil around the post to ensure it’s not shifting or settling, which can put pressure on the post.
Repairing Broken Wood Fence Posts
Repairing broken or damaged fence posts is a common task for homeowners. Proper repair methods ensure the longevity and stability of the fence, preventing future damage and costly replacements. Careful attention to the extent of the damage and the chosen repair method is crucial for a successful outcome.
Addressing the damage promptly is key to maintaining the integrity of the fence line. Neglecting repairs can lead to further deterioration, potentially compromising the structural integrity of the entire fence. A well-maintained fence enhances the property’s aesthetic appeal and protects it from environmental elements.
Assessing the Damage
A thorough inspection of the damaged post is essential before starting any repair work. This involves evaluating the extent of the damage, whether it’s a crack, lean, or complete break. Proper assessment ensures that the chosen repair method is suitable for the specific damage. Consider factors like the post’s depth in the ground, the surrounding soil conditions, and the overall fence structure.
Repairing a Cracked or Slightly Leaning Post
Addressing minor damage like cracks or slight leaning prevents further deterioration. This often involves stabilizing the post to prevent it from worsening. A simple method involves using wooden wedges or shims to support the post. The wedges are strategically placed to correct the lean. This method is usually sufficient for minor problems.
Stabilizing a Leaning Post
A leaning post requires a more robust support system. Using braces, either wooden or metal, is a common technique. The braces are attached to the post and to a nearby stable support, such as another post or a sturdy foundation. Ensure the brace material is strong enough to support the weight of the post and any additional stress. Consider the angle and placement of the brace for optimal stability.
Repairing a Severely Damaged or Broken Post
Severe damage often necessitates more extensive repair or replacement. The repair strategy depends on the severity of the damage. If the post is significantly broken, it might be more cost-effective to replace it with a new post rather than trying to repair the damaged one.
Repair Methods Comparison
Different repair methods offer varying levels of effectiveness and durability. Choosing the right method is crucial to ensure a lasting repair. Several materials can be used for repairs, each with its own set of advantages and disadvantages.
| Repair Method | Pros | Cons |
|---|---|---|
| Wood Filler | Relatively inexpensive, easy to apply | May not be durable enough for severe damage, prone to cracking over time |
| Epoxy | Strong adhesive, can fill significant voids, highly durable | More expensive than wood filler, requires specific application techniques |
| Metal Reinforcement | Extremely durable, can withstand significant stress | More complex installation, potentially more expensive than other methods |
Different repair methods have different strengths and weaknesses. The best method depends on the specific situation and the desired outcome. Consider the post’s location, the amount of damage, and the budget when making a decision. For example, a simple crack might be addressed with wood filler, while a broken post requires a more substantial reinforcement like metal.
Replacing Broken Wood Fence Posts
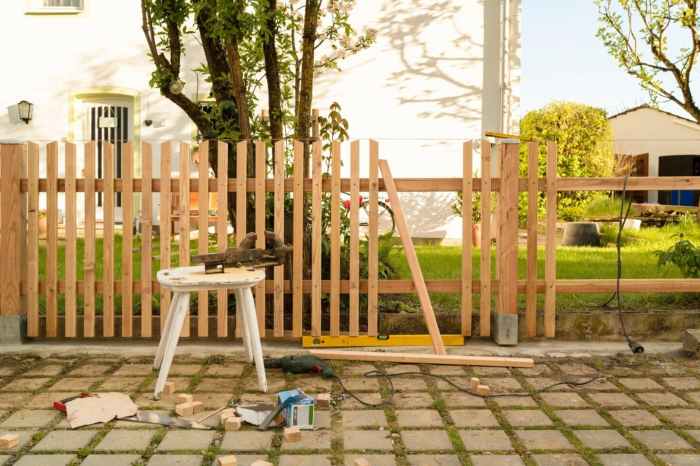
Source: bycarls.com
Replacing a broken fence post is a straightforward process, but careful planning and execution are crucial for a lasting repair. Proper post selection, ground preparation, and installation methods contribute to a strong and aesthetically pleasing fence. This section details the steps for safely removing the old post, preparing the new site, and installing the replacement.
Replacing damaged fence posts ensures the long-term integrity of your fence line. A poorly installed replacement post can lead to future problems like sagging or unevenness. Following the steps Artikeld below will result in a structurally sound and visually appealing repair.
Removing the Broken Post
Proper removal of the broken post is essential to ensure the safety of yourself and others. Improper removal can result in injury and further damage to the surrounding area. A post that is severely damaged or rotted may require specialized tools. Use caution and appropriate safety gear when handling potentially unstable materials.
- Assess the post for stability. If it’s significantly weakened, use caution and support the post as you remove it.
- If possible, carefully saw or cut the post into manageable sections, working from the top down to avoid a sudden collapse. Use sturdy sawhorses or other support structures to help with this.
- Use a pry bar or digging bar to loosen the soil around the base of the post. Work your way around the post to remove the surrounding soil and make it easier to pull out.
- Once the soil around the base is loosened, use a post hole digger or a shovel to lift and remove the post. If the post is embedded deep, consider using a post hole digger to assist with the removal process.
- If the post is very difficult to remove, carefully cut away any parts of the fence that are connected to the post. This will make it easier to remove and handle the post.
Preparing the Ground for a New Post
A solid foundation is critical for a stable replacement post. Improper preparation can lead to uneven settling and ultimately compromise the integrity of the entire fence line.
- Excavating the Hole: Carefully dig a hole that is at least 2 feet deep and slightly wider than the base of the new post. The hole’s depth should be approximately 2 to 3 times the width of the post’s base. This ensures proper support and prevents the post from shifting. A post hole digger will help with this step.
- Leveling the Hole: Ensure the bottom of the hole is level. Use a level to check the horizontal and vertical alignment. If necessary, add or remove soil to achieve a perfectly level bottom. This prevents the post from leaning or tilting.
- Compacting the Soil: Carefully compact the soil around the base of the hole. Use a tamper or your feet to firm the soil around the bottom of the hole. This step is important for preventing settling later.
Types of Replacement Posts
Various materials are available for replacement posts, each with its own set of benefits and drawbacks.
- Pressure-Treated Lumber: This is a common choice for its durability and cost-effectiveness. Pressure-treated lumber is treated to resist rot and decay, making it suitable for outdoor use. It’s readily available and relatively inexpensive.
- Metal Posts: Metal posts, such as steel or aluminum, are known for their strength and longevity. They are resistant to rot and decay, making them ideal for high-traffic areas or harsh climates. However, they can be more expensive than pressure-treated lumber.
- Composite Materials: Composite posts are a newer option that combines wood fibers with polymers. They are resistant to rot, insects, and decay, and require less maintenance than traditional wood posts. They often come in a variety of colors and styles.
Installing a New Post
The installation process should be precise to ensure a strong and stable foundation. Improper installation can result in future problems, including fence sagging or leaning.
- Positioning the Post: Carefully position the new post in the prepared hole, ensuring it is plumb (vertical) and level. Use a level to verify the post’s alignment.
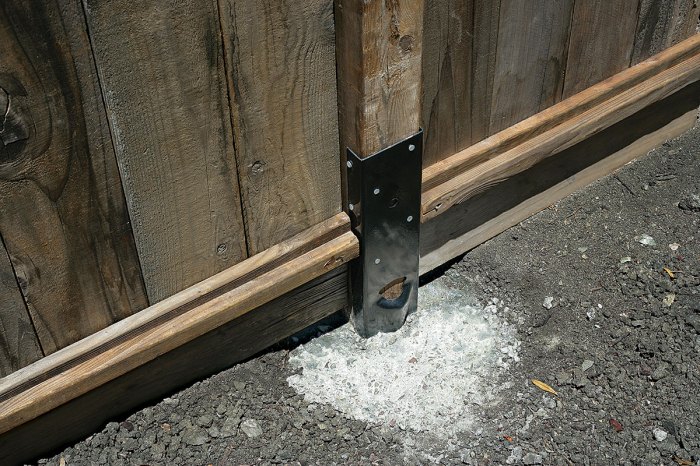
- Anchoring the Post: Pour concrete into the hole, ensuring the post is firmly embedded. Ensure the concrete reaches the specified depth to provide adequate support. Follow the manufacturer’s recommendations for concrete mix ratios for the best results.
- Securing the Post: Once the concrete has cured, secure the post to the fence line. This may involve using brackets, bolts, or other appropriate hardware to connect the new post to the surrounding fence sections.
Preventing Future Damage
A well-maintained fence is a testament to careful planning and ongoing upkeep. Proactive measures in post installation and ongoing maintenance dramatically reduce the likelihood of future damage, saving time and money in the long run. By understanding the factors contributing to post failure and implementing preventive strategies, you can ensure the longevity and structural integrity of your fence.
Proper installation and material selection are foundational to preventing future damage. A solid foundation is crucial for a stable fence, and this starts with the posts. Ignoring these crucial steps can lead to costly repairs and significant structural problems down the line.
Proper Post Installation
Careful installation significantly impacts the longevity of fence posts. The correct depth and spacing, along with appropriate soil conditions, are critical for preventing future problems. Using the right materials and methods is equally important.
- Post Depth: Adequate post depth ensures stability. Posts should be buried deep enough to resist the forces of wind and ground movement. The depth should be determined by the type of soil and the anticipated stresses on the fence. For instance, in high-wind areas, deeper placement is essential. A common rule of thumb is to bury the post at least 2 to 3 times the diameter of the post, plus 6-12 inches for additional stability. The actual depth might vary depending on the local soil conditions and the specific fence design.
- Spacing and Alignment: Maintaining proper spacing between posts is essential for uniform stress distribution. Consistent spacing ensures the fence maintains its structural integrity. Measure carefully and use stakes to mark the exact location for each post to ensure straight alignment. Proper spacing also allows for expansion and contraction of the wood due to weather changes.
- Soil Conditions: Soil type significantly influences post stability. Compacted or poorly drained soil can lead to post movement. If the soil is loose, consider using concrete footings to provide a more solid base for the post. Adding gravel or compacted fill to the soil around the post can enhance stability.
Material Selection and Preservation
Choosing the right materials and applying appropriate treatments can significantly extend the lifespan of your fence posts.
- Wood Preservatives: Using pressure-treated lumber is a common and effective method for protecting wood from rot and decay. Proper application of preservatives is crucial. Follow the manufacturer’s instructions carefully to ensure effective treatment. This helps resist fungal growth and insect infestations.
- Concrete Footings: Concrete footings provide a solid, long-lasting base for the posts, especially in areas with high soil movement or heavy loads. Proper concrete mix and placement are essential for a strong and stable foundation.
- Alternative Materials: Consider alternative materials like metal or composite posts, which offer enhanced durability and resistance to weather damage and pest infestations. These materials may have a higher initial cost but can prove more cost-effective in the long run due to their longevity.
Regular Inspections and Maintenance
Regular inspections and proactive maintenance are key to preventing future damage. Early detection of problems like cracks or leaning posts allows for timely intervention and prevents further damage.
- Visual Inspection: Regular visual inspections for signs of damage or deterioration, like cracks, rot, or leaning, are crucial. This allows for early intervention and prevents minor issues from escalating into major problems. Check for any signs of pest activity as well.
- Soil Maintenance: Proper soil maintenance around the posts is important to ensure the soil does not wash away or become overly compacted. Regular watering, especially during dry spells, can prevent soil erosion and maintain the surrounding area. Proper grading around the base of the post will help water drain away and prevent moisture build-up.
- Pest Control: Regular inspections for signs of pest infestations (wood-boring insects, termites) are essential. Addressing pest problems promptly can prevent significant damage. Use appropriate pest control methods to protect the posts from further damage. A preventive strategy is often more cost-effective than reactive measures.
Weather Protection
Protecting posts from weather elements is critical to their longevity. Weather damage can lead to rot, decay, and structural weakness.
- Weatherproofing: Use appropriate weatherproofing measures, such as applying sealant or paint to the exposed portions of the posts, to protect them from moisture and UV radiation. This helps prevent moisture penetration and degradation.
- Shielding: Consider using protective coverings, such as tarps or weather-resistant wraps, during periods of extreme weather, such as heavy rain or snow. These measures can minimize damage during storms and help protect the posts from long-term exposure.
Tools and Materials
Properly repairing or replacing a broken fence post requires the right tools and materials. Careful selection ensures a strong, lasting repair and prevents future issues. The following sections detail the necessary components for a successful project.
Essential Tools
A well-equipped toolbox is crucial for this project. Different tools are needed for various tasks, from digging and measuring to securing the post. This section Artikels the required tools.
| Tool Name | Description | Purpose |
|---|---|---|
| Post Hole Digger | A tool designed for digging holes of the appropriate size and depth for fence posts. | To create a stable base for the new or repaired post. |
| Measuring Tape | A flexible tape measure for precise measurements. | To determine the correct dimensions for the post hole and any necessary lumber. |
| Level | A tool for ensuring a straight and level installation. | To guarantee the fence post is vertical and aligned with other posts. |
| Shovel | A standard shovel for digging and moving soil. | To assist in digging and removing excess soil from the hole. |
| Hammer | A standard claw hammer for driving fasteners. | To drive in nails, screws, or other fasteners. |
| Safety Glasses | Essential protective eyewear for eye safety. | To protect the eyes from flying debris during hammering or other tasks. |
| Gloves | Work gloves for protecting hands during digging, handling materials, and driving fasteners. | To protect hands from cuts, scrapes, and splinters. |
Necessary Lumber
The choice of lumber directly impacts the longevity and strength of the fence post repair. Select high-quality, treated lumber for optimal results.
- Replacement Post (if replacing): Select pressure-treated lumber for its resistance to rot and decay. Dimensions will depend on the original post and the height of the fence. Typical sizes range from 4″ x 4″ to 6″ x 6″ in cross-section and 6 to 8 feet in length. Ensure the selected post is compatible with the existing fence structure.
- Post Repair Support (if repairing): If repairing a broken post, the supporting wood needs to match the dimensions and type of the existing post. The support must be able to provide the necessary structural integrity to the post. The material should also resist decay.
Essential Fasteners
The selection of fasteners is critical for a secure and lasting repair. Properly sized and appropriate fasteners will maintain the integrity of the fence post.
- Nails: Use galvanized nails for outdoor use. The size of the nails should be appropriate for the thickness of the lumber being joined. A sufficient number of nails will be required for secure attachment.
- Screws: Consider using galvanized screws for added strength and durability. The size of the screws will depend on the thickness of the lumber and the desired level of security. Pre-drilling holes can aid in the insertion of screws and prevent splitting of the wood.
Important Chemicals (if applicable)
Applying wood preservative can significantly increase the lifespan of the repaired or replaced post. This is particularly important for outdoor applications.
- Wood Preservative: A quality wood preservative will protect the wood from rot, decay, and insect damage. Choose a product designed for outdoor use and follow the manufacturer’s instructions carefully.
Cost Analysis
Assessing the financial implications of repairing or replacing a broken fence post is crucial for making informed decisions. Understanding material costs, potential labor expenses, and the overall expense of various repair options will help determine the most cost-effective approach. Factors like the severity of damage, the type of wood, and the need for professional help will all influence the final cost.
Analyzing the cost of repairs or replacements allows homeowners to budget effectively and compare different options to find the most suitable solution for their needs and budget.
Material Cost Estimation
The cost of materials directly depends on the type of wood chosen, the size of the post, and any necessary hardware. Pressure-treated lumber, a common choice for fence posts due to its durability, generally costs more than untreated wood. The quantity of material required is influenced by the extent of the damage and the chosen repair or replacement method. For instance, replacing a completely broken post requires more material than repairing a cracked one. Accurate measurements are vital to prevent material waste and ensure cost-effectiveness.
Labor Cost Considerations
Hiring a professional to repair or replace fence posts introduces labor costs. These costs vary based on factors like the complexity of the job, the geographic location, and the experience level of the contractor. For minor repairs, a homeowner might be able to handle the work themselves, saving on labor expenses. However, more extensive replacements or repairs might benefit from professional assistance, especially if the homeowner lacks the necessary tools or expertise. Professional contractors often charge by the hour or by the job, and estimates can be obtained from local contractors.
Comparison of Repair Options
Different repair methods have varying costs. A simple repair of a cracked post, perhaps using a wood epoxy or other suitable adhesive, is typically less expensive than replacing the entire post. However, the longevity of the repair needs consideration. For instance, while a simple repair might seem less expensive initially, if the damage is extensive, a full replacement might be the more cost-effective long-term solution.
Cost Comparison Table, Fix broken wood fence post
| Repair/Replacement Option | Material Cost (USD) | Labor Cost (USD) | Total Estimated Cost (USD) |
|---|---|---|---|
| Repair (Cracked Post) | $20 – $50 | $50 – $150 | $70 – $200 |
| Replacement (Partial Damage) | $50 – $100 | $100 – $300 | $150 – $400 |
| Replacement (Total Damage) | $75 – $150 | $150 – $500 | $225 – $650 |
Note: Costs are estimates and can vary based on specific materials, labor rates, and project complexity.
Final Thoughts
In conclusion, fixing a broken wood fence post can be a rewarding DIY project. By following the steps Artikeld in this guide, you can effectively address the issue, ensuring the longevity and structural integrity of your fence. From assessing the damage to choosing the appropriate repair or replacement method, the guide provides a thorough approach. The comprehensive analysis of various materials and methods, alongside a cost comparison, empowers you to make informed decisions for your specific needs. Remember, proper preventative measures and regular maintenance are key to avoiding future problems and preserving your fence.